Gravitymon for Cuckoo Tilt!
A few weeks back there was a post on the homebrewtalk forum discussing running Gravitymon on a Cuckoo Tilt from Aliexpress. My first reaction was that it would be really hard to figure out the hardware setup and add support for that device. But then to my surprise they showed some screenshorts of the UI and the software was based on Gravitymon! It was a custom version and it was named Cuckoo.
So my first reaction was quite positive, good that someone is using my software, but when i took a closer look and saw that thay had changed the software into a closed ecosystem, dependant on their own cloud service, I got frustrated.
My purpose of the project was to make it free to use and avaialble for everyone, any changes should be shared with the community.
License change - GPL v3
I have always used the MIT license to make sure that the software should stay free, but in this case i regard that as missuse. MIT is quite open and does not force users to publish their changes for the benefit of others. GPL v3 requires changes to be published as open source.
So i decided to switch all my projects to GPL v3 instead, for the normal user that means nothing, my projects will be free for everyone to use and modify as long as the changes are published. I will continue to allow building devices and selling with Gravitymon them without a commercial license as long as they are not a company.
For companies that want to use my projects the software and make a profit they will be required to get a commercial liense from me. If I get any income from this it will go directly to improve and support current and future projects as sponsoring.
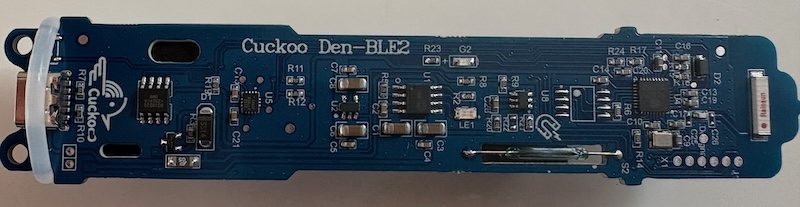
Cuckoo Tilt - Hardware
The hardware and device is quite nice and is very well built, and here is my findings so far;
- Main CPU is an ESP32-C3FH4
- Gyro is the modern ICM-42670-P that is factory calibrated
- LIPO Charger, probably TP-4056 which is charged via the USBC port (no serial on this port)
- DS18B20 temperature sensor set to 11 bits resolution
- Battery is a standard 18650, 2200mAh
- Wireless charger connected to the USBC port under the cap
- 2 LED, one for charger and one for the ESP32
- Reed switch (normally open) connected to the RST pin to allow for reset via magnet
- Device is calibrated from factory and is perfectly balanced at 25 degreees
- Cap has seal so it should be good for pressure
So the hardware is really good and if you can get it for a decent price its worth considering.
Cuckoo Tilt - Software
On the software side they had limited the software to only expose some features and limit that to sending data to their cloud service which is in Chinesee language only. I will not dig into the details on the software but I could not get the confguration mode to work with their version, i could only access the UI via the wifi settings portal.
But since they have been using the same flash layout as Gravitymon its possible to just upgrade to the regular Gravitymon firmware via the firmware flashing feature.
The setup is similar to the build for Lolin ESP32 C3 mini except that they have switched the RBG led from pin 7 to pin 8, that was the only change that i have found so far. So i ended up making a separate build target for this device to support the hardware fully. These are the changes i made.
- Added Cuckoo as a hardware option, and this is used in the UI to hide some features.
- Added a feature in the gravity formula editor to reverse engineer the formula and store data points. This will only work if the list is empty.
- Enabled RBG LED on GPIO8
- Hid the gyro selection option in the UI since there is only one gyro and that is the ICM-42670-P
- Hid the charging pin feature (i have not found that they were using that)
- Hid the X/Y gyro swap toggle since that is not required
Cuckoo Tilt - Bricked device
When i was playing around with the device managed to crash the device so it was unresponsive and i needed to figure out how to get access to the serial port to reflash it. So here is the steps for that. In my case it was a boot failure in the ROM code probably caused by some flux residue from the soldering.
On the PCB there are 6 pads between the end of the PCB and X1 text, and these expose some of the pins and is used to do the factory flashing. You dont need all of the pins but this is there function, from left to right:
- TXD (Orange)
- RXD (Purple)
- GND (Black)
- VCC (3.3V)
- BOOT - GPIO9 (White)
- Reset (EN)
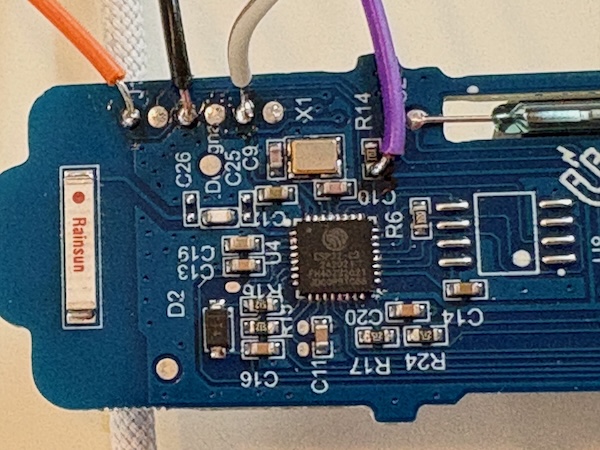
You will need a TTL to USB adapter to connect to these pins and you only need to connect RXD, TXD, GND and power the Cuckoo from the USBC port. You need to swap the TX/RX pins when connecting to the adapter.
To force the device into download mode, ground the BOOT pad and then use the magnet to do a reset, remove the ground from BOOT and you should be in download mode. If the flashing fails you will need to do this again to force it into download mode. You will not get any serial output when the device is running since the RXD is used for the LED.
As you can see in the picture i have soldered the RXD to the R14 resistor since that resistor is inline probably to protect the RXD pin. Be careful not to short anything when doing this, and remove any flux that is left from the soldering, this is what casued my device to crash when flashing it the first time.
Flashing the device should be straight forward, but since things can go wrong i wanted to share how i fixed that and also what i found when looking into the code/device.
Summary
I think this is a really good hardware to run Gravitymon on and for those that are not willing to build their own device, this is a good option. The wireless charger I bought is just a standard phone charger so if you already have one of those, there is no need to buy it.
Happy brewing, Magnus